This is a beginner’s guide, but it would be best for you to have some prior technical knowledge. Also, we do not recommend port forwarding the Xbox if you don’t need to. So, the initial step is verifying you actually need to do it. To finish the introduction, we should say the tutorial works equally for Xbox Series and Xbox One. But if you want a quick answer…
What Ports to Open for Xbox Series X?
Perhaps you already know the steps for port forwarding the Xbox, the PlayStation, a Windows PC, or other devices. It’s similñar for either option. So, if you want to do it quickly, here’re the ports you can use for an Xbox port forwarding rule:
Port 3074 (UDP and TCP)Port 53 (UDP and TCP)Port 3544 (UDP)Port 80 (TCP)Port 500 (UDP)Port 4500 (UDP)Port 88 (UDP)
These are the ports you’d choose when adding a virtual server, port forwarding rules, or similar for your Xbox. If you don’t know what we’re talking about, follow the complete tutorial.
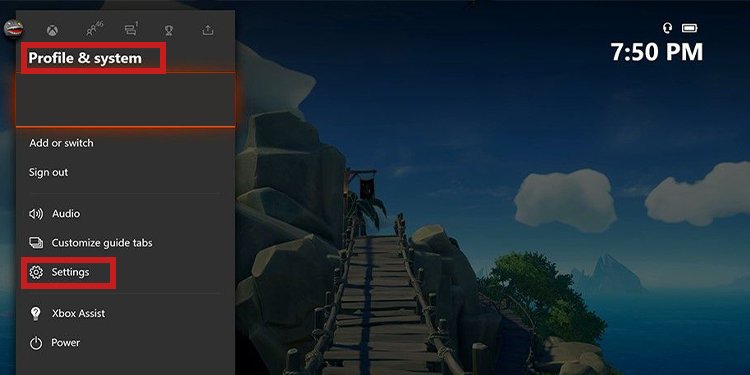
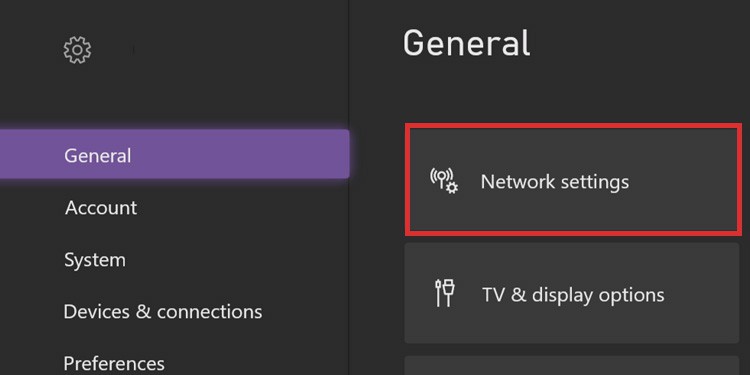
How to Set Up Port Forwarding for Xbox?
The Xbox port forwarding tutorial has five general steps:
Understanding NAT Type: The NAT Type configuration comes with the router. “Port forwarding” a device through the router’s admin page allows you to change the Type. Adding a static IP to your Xbox: You need a static IP, an address that won’t change, to use on your port forwarding rules. Accessing your router or gateway admin page: Port forwarding the Xbox requires accessing the router or gateway admin page. In case you don’t know how to do it, we’re showing you how.Enabling UPnP on the router: The Universal Plug and Play feature is required to open up the ports. Specifically, it allows network devices to create port forwarding rules. Opening a port on your router: You redirect a specific device to specific ports. In this case, the Xbox console will use particular Microsoft network ports. It allows your console to communicate with the Xbox’s network servers.
Understanding NAT Type
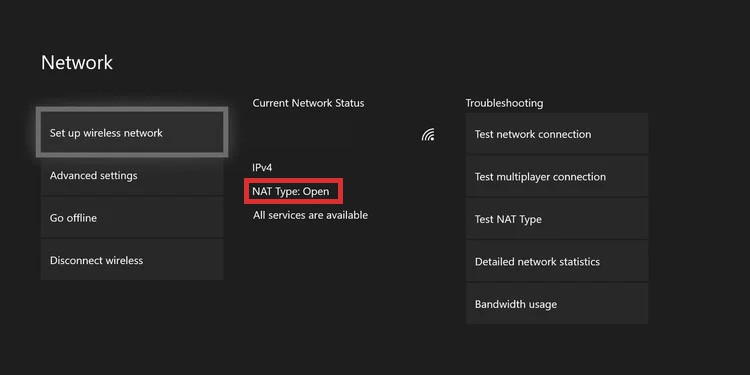
Network Address Translation (NAT) is how a router or gateway translates public IPs into private IPs and vice-versa. For example, it takes the private IP address of your Xbox and sends it as a public IP to the network so others can share it with you. There’re three NAT categories, which are innate to the router/gateway and your internet service provider. The category determines how your devices can interact with other devices on other networks: For instance, if your NAT Type is Open, you’ll be able to play and share with any other Xbox, regardless of their NAT Type. But if your NAT is Strict, you’d only be able to communicate with Open configurations. That’s why it’s a limiting feature. Port forwarding generally changes NAT Type to Open, as it’s the default configuration for Microsoft’s ports. It’s the option we recommend, as it can communicate with Open and Moderate settings, but not Strict.
Testing Your NAT Type Configuration
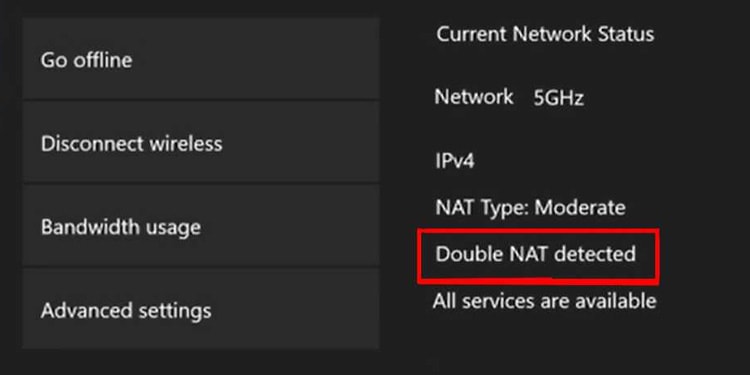
Let’s check your Xbox’s NAT Type configuration. Port forwarding the Xbox will change the NAT Type, but you don’t always need to change it. If the result is NAT Type 1 (Open) or NAT Type 2 (Moderate), you don’t need to do anything. If the result is NAT Type 3 (Strict), proceed with the tutorial. The latter is a limiting option that will damage online features such as game chats, online gaming, and streaming. Lastly, you’d see a related error on the Network screen: “Double NAT detected.” Ensure you’re not getting it before going through the following process.
Adding a Static IP to Your Xbox
Either via WiFi or ethernet cable, the gateway, modem, or router will assign a dynamic IP address to the console and any other device every time they log in. Dynamic addresses change every time, so they don’t repeat each other. However, we need to add a static IP, as we need the specific number to use when we add port forwarding rules. Here’s how to add a static IP address on your Xbox One or Xbox Series. If the connection doesn’t work, ensure that you only changed the last number on the IP. You can set back the IP in automatic mode, write it down again, and try again. But then, add 50 to the last digit rather than 100. You can add any number between 50 to 100 until it works. Typically, though, it will work the first time. In any case, a static IP may improve your Xbox’s connection quality and download speeds.
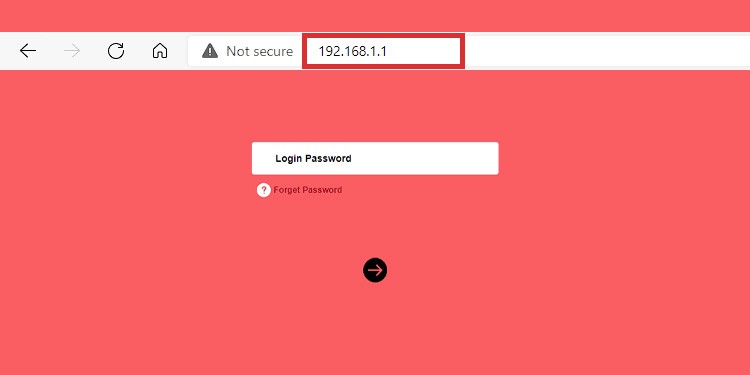
Accessing Your Router or Gateway Admin Page
If your network has a custom name and password, you or someone else in your household has already accessed the router’s admin page. You can change the network’s default name and password from the page and configure other sensitive options. If you have already accessed it, you can skip this section. If you haven’t, but your network uses a custom password and name (rather than the default name and password), you have two options:
Ask the person who created the password for the admin password.Reset the router or gateway. You can use a pin to push and hold the reset button for about 10 seconds. It’s typically on a small hole in the rear or sides of the device.
If the network uses default settings (like the brand’s name plus a long and convoluted password), here’s what you do: If you push the device’s reset button, it will reset the device to default, which means you can access it with the default admin and password you’d find on the back of the router. Regardless, once you navigate to the site, you’ll find a page like this one. You can press login to access the router.
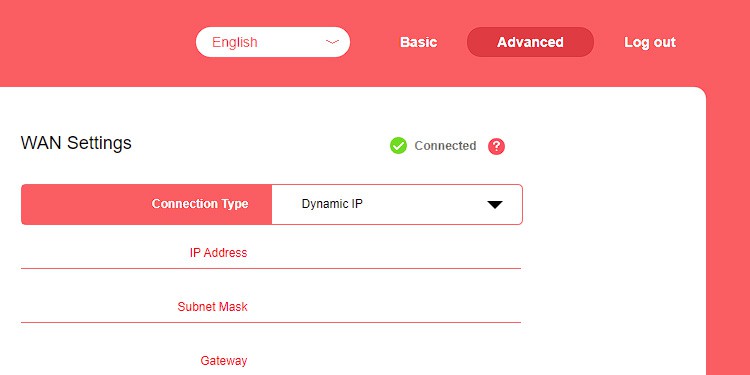
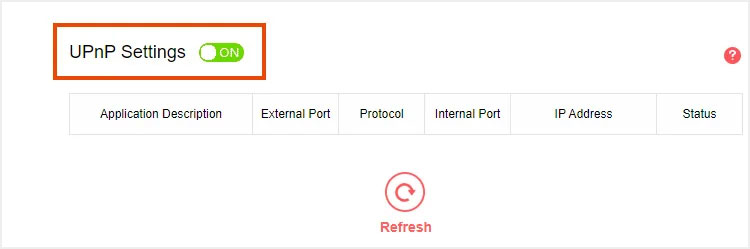
Enabling UPnP on the Router
Every router brand has a different interface, options, and features for its admin page. It means I can’t guide you exactly on what you need to do or where to find the options you want. However, every router has UPnP, as well as port forwarding rules. However, you may find the latter with a different name. I will guide you while using my router’s interface, a Mercusys device. You will have to do it on your own, and if you can’t find the option, I advise you to search for a brand-specific tutorial. However, you’d find the option on a very similar menu like this one:
Opening a Port on Your Router
The last step is the Xbox port forwarding itself. It’s also known as adding virtual servers or port forwarding rules. As you’d expect, it works within the router’s admin page. Essentially, it changes the NAT Type configuration by allowing your console to bypass the router’s firewall. As a result, it will communicate with the Xbox server ports successfully. The option is near the UPnP settings. You’d find it as:
Port ForwardingVirtual ServersPort Forwarding RulesVirtual Server RulesApplicationsAdvanced ApplicationsApps & GamingPort Range ForwardingNAT ForwardingPort Triggering
Let’s see exactly how to do it. Remember, my tutorial follows my specific brand, but you’ll find very similar options: These are the ones Microsoft recommends. You must choose the same number for both. Also, because some are UPD and others are TCP, we recommend leaving the Protocol as “All” to avoid issues. Lastly, remember to Save after you type the information. Afterward, you can exit the router’s admin page. You’re done with the tutorial.
What’s Next?
You can go back to your Xbox’s network settings and check your NAT Type, as I explained above. You successfully set up port forwarding for Xbox if it’s Open or Moderate rather than Strict. Otherwise, erase the port forwarding rule / virtual server you added, and place a new one with another port. You can also change the Protocol to something that fits your selection for the new trial.